
How to Create an Item Page

iRobot and 8 other contributors
Last updated on Mar 21, 2022
Views: 217
View statistics:
- Past 24 Hours:
- 0
- Past 7 Days:
- 0
- Past 30 Days:
- 1
- All Time:
- 217
Comments: 0
No one has left comments on this guide. Will you be first?
Go to guide commentsCompleted: 3 4
3 people have marked this guide "completed." Will you be next?
4 people have marked this guide "completed." Including you — great job!
Favorites: 5 6
5 people have favorited (and subscribed to) this guide. Will you be next?
6 people have favorited (and subscribed to) this guide — including you!
Introduction
Go to step 1 ↓This guide demonstrates how to create an item page.
-
-
-
From the iFixit homepage, hover over Community and click on Get Involved.
-
Click on Contribute.
-
Click on Create a new device page.
-
-
-
Start a new page. Select Item.
-
Enter the new Item Page Title in the text box.
-
Click Next.
-
-
-
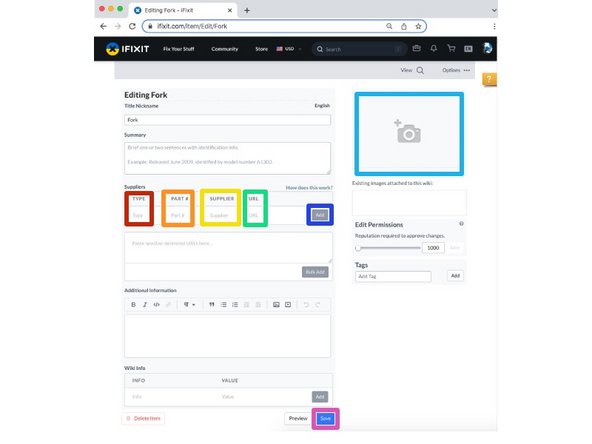
You can now customize the page for the item.
-
Enter the Item type. (For example, is the item a Part or Tool?)
-
Enter in the Part Number.
-
Enter in the Supplier Information
-
Enter the URL where the item can be purchased.
-
Add an image of the item by selecting the grey, Add an Image box and uploading a photo.
-
Click Add to save this particular sources information.
-
After customizing the page, click Save.
-
-


To reassemble your device, follow these instructions in reverse order.
Cancel: I did not complete this guide.
3 other people completed this guide.